To see a Compose screen properly, you need it on every device, in both themes, in every state: empty, loading, error, long text. Writing that by hand takes dozens of @Preview functions per screen, and Android Studio slows down trying to render them all.
compose-auto-preview is an open-source library I maintain that replaces all of it with one annotation. It gives you two things:
- In Android Studio, a light preview pane: every device and theme, first state only.
- From Gradle, the full matrix as PNGs, plus an HTML report that draws your app as a navigation graph.
The problem: previews don't scale
A well-previewed screen in Compose today looks like this:
class SettingsStateProvider : PreviewParameterProvider<SettingsState> {
    override val values = sequenceOf(
        SettingsState(),
        SettingsState(notificationsEnabled = false),
        SettingsState(username = "max"),
    )
}

@Preview(name = "Phone · Light", device = Devices.PIXEL_7)
@Preview(name = "Phone · Dark",  device = Devices.PIXEL_7, uiMode = UI_MODE_NIGHT_YES)
@Preview(name = "Tablet · Light", device = Devices.PIXEL_TABLET)
@Preview(name = "Tablet · Dark",  device = Devices.PIXEL_TABLET, uiMode = UI_MODE_NIGHT_YES)
@Composable
internal fun SettingsScreenPreview(
    @PreviewParameter(SettingsStateProvider::class) state: SettingsState,
) = SettingsScreen(state)
That's the small version. It has two costs.
You write and maintain it by hand. Every screen needs its own PreviewParameterProvider and its own stack of @Preview lines. Add a foldable, add two states, multiply by 30 screens. The name = "..." strings drift the first time someone copy-pastes.
Android Studio pays for every cell. Studio keeps a render session for each preview cell in the open file, so memory grows with the cell count. A few screens at device × theme × state can take gigabytes. The pane stops repainting, and you reach for Invalidate Caches and Restart.
Neither is a Compose bug. The preview API just wasn't designed for a matrix of states across a whole app.
The fix: describe the matrix once
List your states in a plain Kotlin object:
object SettingsSamples {
    val Default          = SettingsState()
    val NotificationsOff = SettingsState(notificationsEnabled = false)
    val Filled           = SettingsState(username = "max")
}
Then write one preview function:
@AutoPreview(
    samplesFrom = SettingsSamples::class,
    devices = [Device.Phone, Device.Tablet],
    themes  = [Theme.Light, Theme.Dark],
)
@SettingsScreenAutoPreviews
@Composable
internal fun SettingsScreenPreview(
    @PreviewParameter(SettingsScreenPreviewSamplesProvider::class) state: SettingsState,
) = SettingsScreen(state)
On the first build, KSP generates what you used to write by hand:
SettingsScreenPreviewSamplesProvider, aPreviewParameterProviderwith your samples in declaration order.@SettingsScreenAutoPreviews, a multi-preview annotation holding thedevice × themegrid.
Both names are red in the editor until that first build. Type them anyway: that's the only friction worth knowing up front.
Two places, two jobs
The same annotation renders in two places, each tuned for what you do there:
| Where | What renders | Why |
|---|---|---|
| Android Studio | devices × themes, first state only |
Keeps the pane responsive while you edit |
./gradlew autoPreview |
devices × themes × states as PNGs + HTML report |
Renders the full matrix outside the IDE, in a separate JVM |
With 3 samples in the example above, Studio shows 4 cells and the report holds 12. You edit against a light pane and review everything in one place.
The Gradle side renders with Robolectric, so there's no emulator and no device. The task is incremental: if the code didn't change, nothing re-renders.
The report: your app on one page
Running ./gradlew :app:autoPreview builds a static HTML report and opens it in your browser. It has three views.
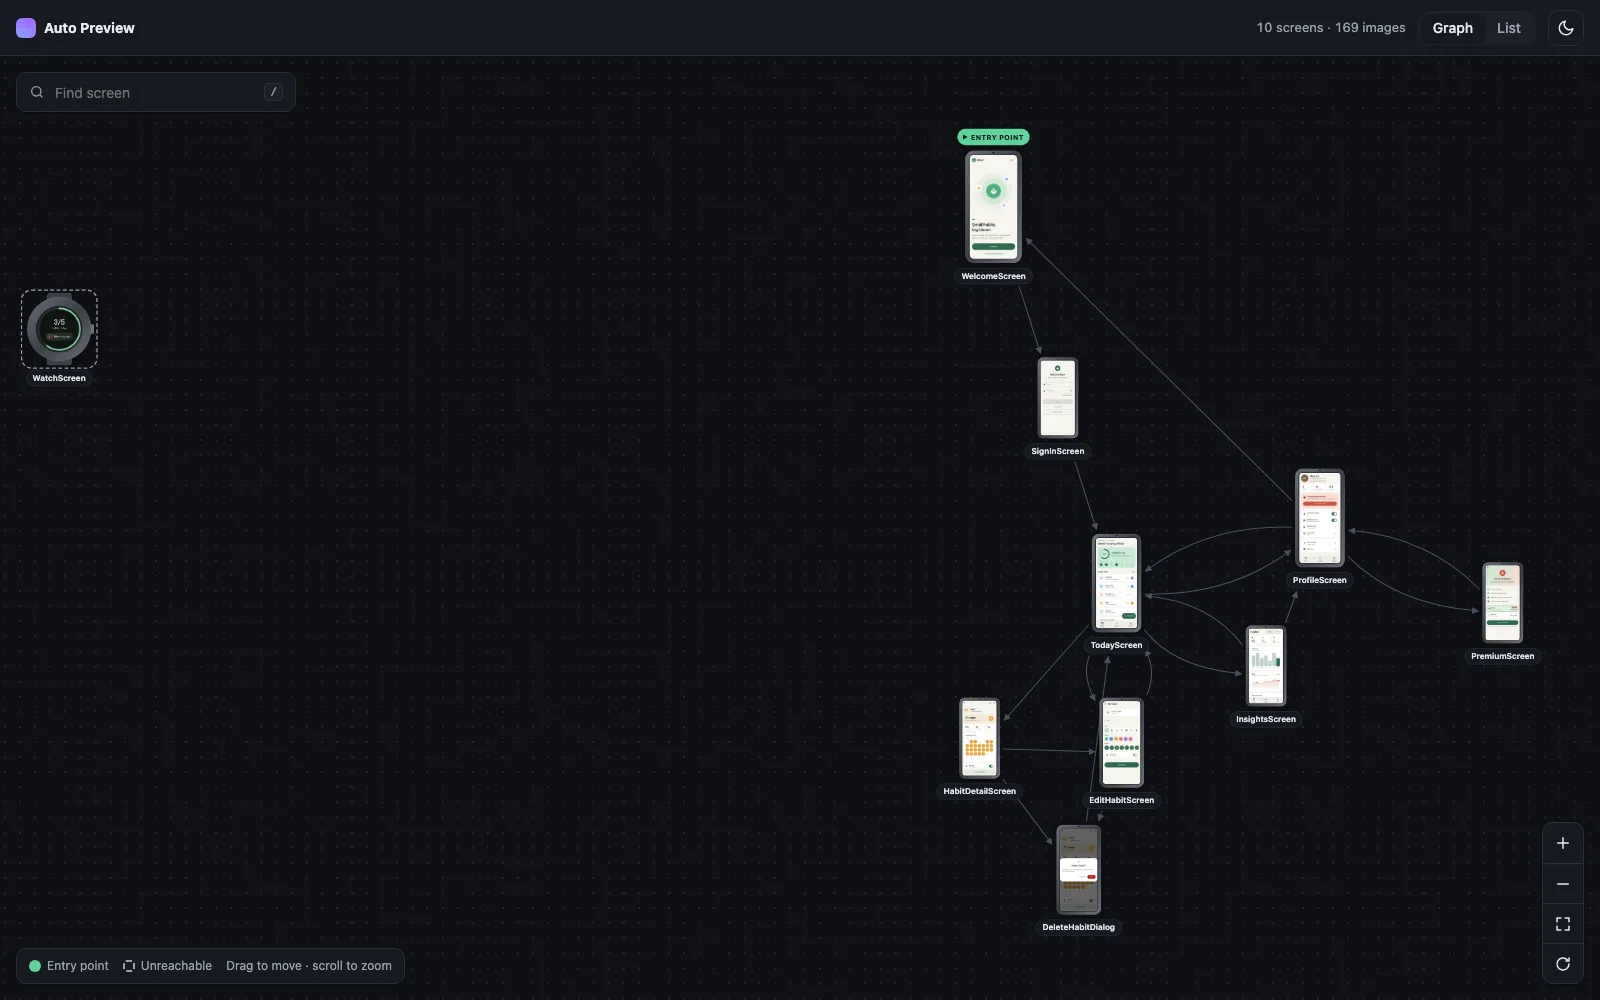
The app graph. Mark your start screen with entryPoint and declare edges with navigatesTo:
@AutoPreview(samplesFrom = OnboardingSamples::class, entryPoint = true, navigatesTo = ["SettingsScreen"])
@AutoPreview(samplesFrom = SettingsSamples::class, navigatesTo = ["ConfirmDialog"])
The report lays the screens out from the entry point along those edges, like the graph at the top of this post. Screens the entry point can't reach are drawn dashed on the outer ring, and an unknown screen id is a build warning. You get a navigation map that stays in sync with the code, because the code produces it.
A page per screen. Every state in light and dark, one tab per device:
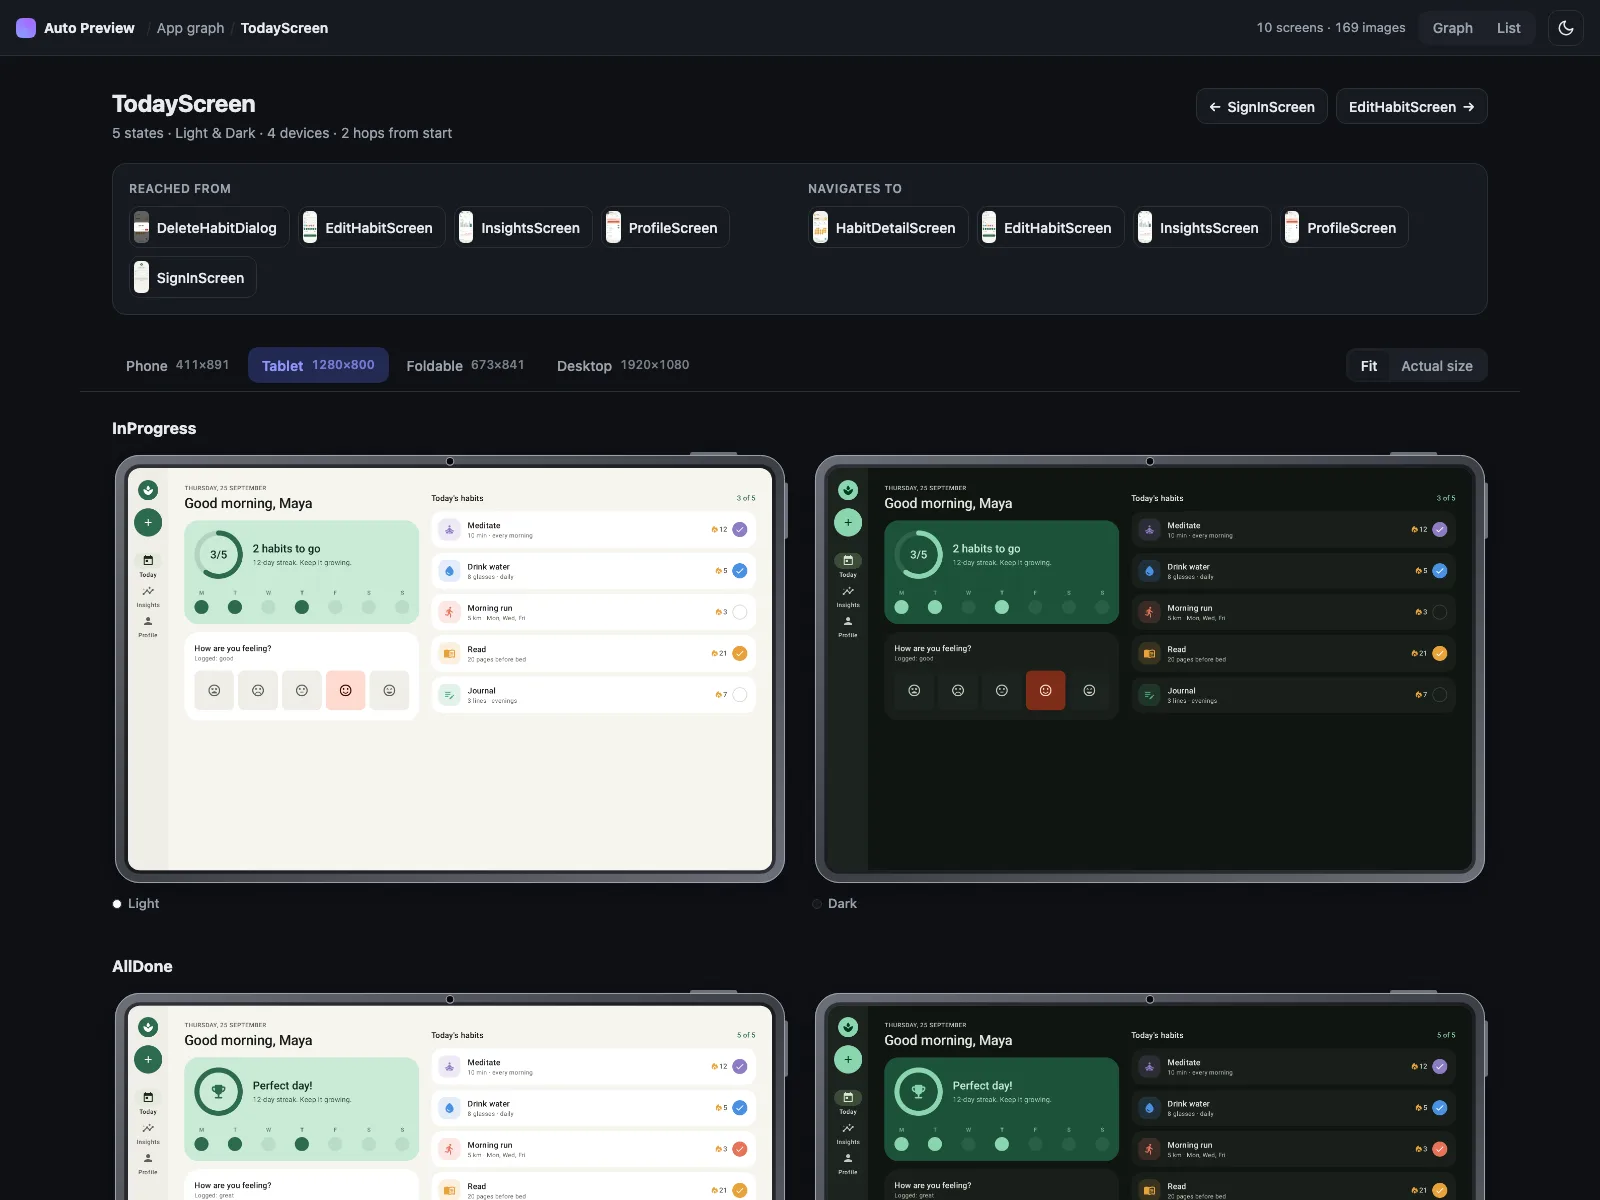
←/→ for states, T toggles theme, / searches.This is where regressions show up. A clipped label in the long-text state or an unreadable color in dark mode is hard to miss when every state sits side by side.
A list of every screen, with how many hops each one is from the entry point, where it's reached from, where it goes, and which devices it targets:
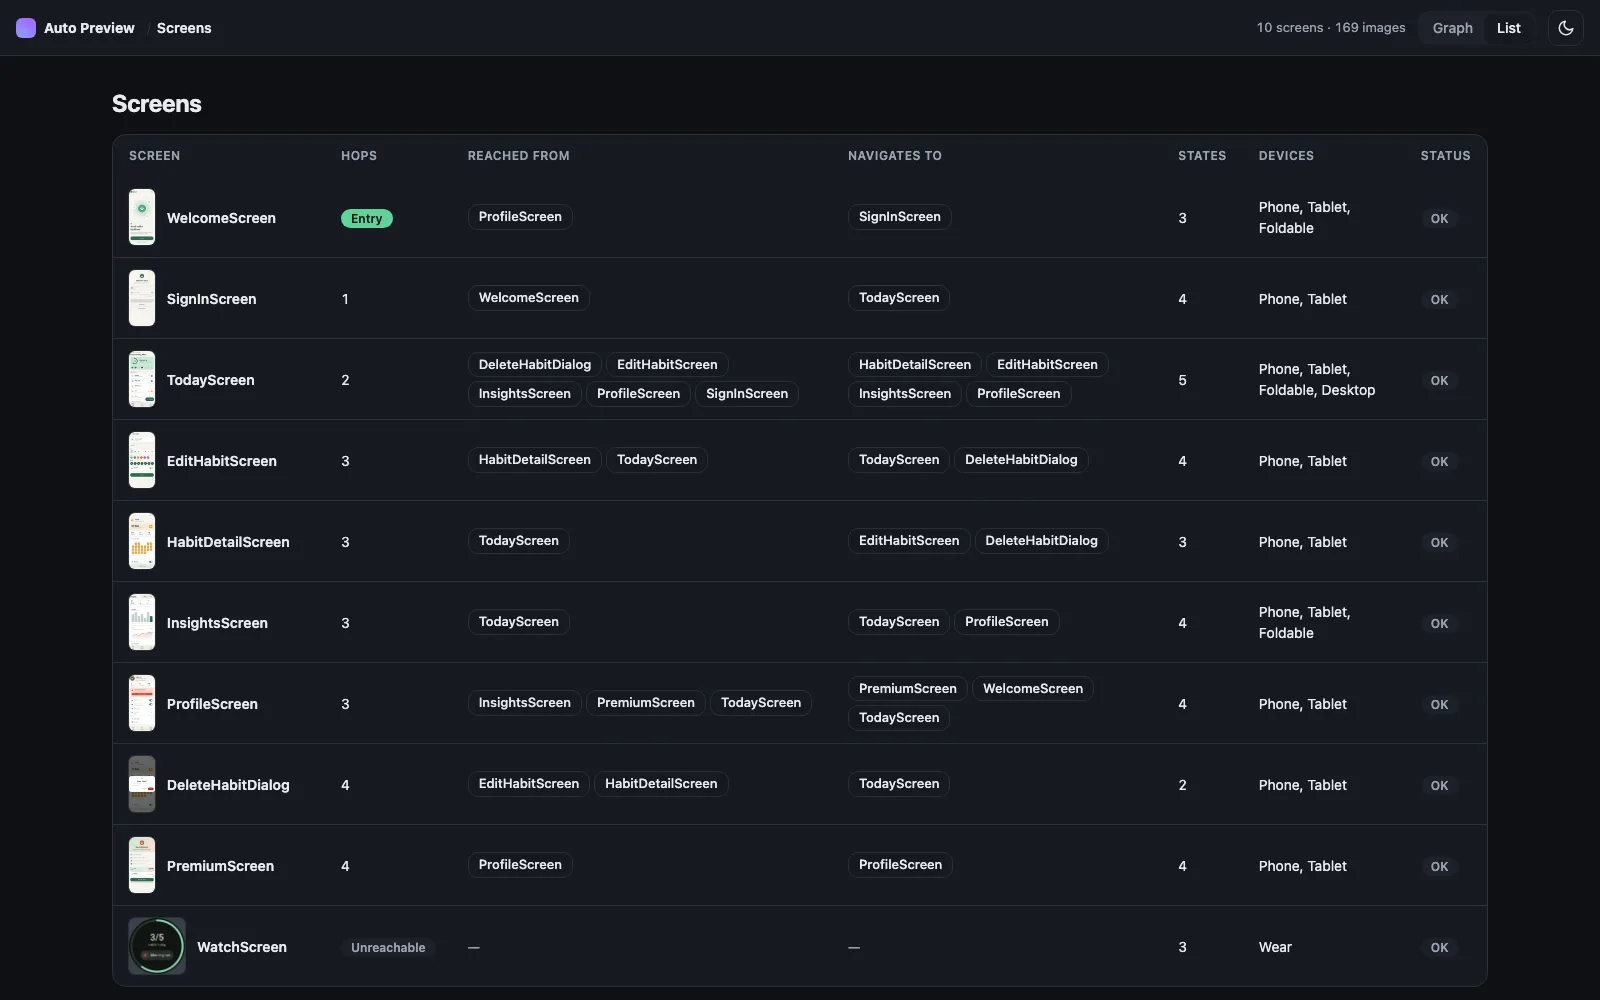
The report is plain HTML, CSS and JS: no server and no build step. It opens from disk, so you can publish it with GitHub Pages as a living design review. The demo in this post is exactly that.
Setup in two minutes
1. Apply the plugin next to KSP. It adds the annotations, the processor and Robolectric for you:
plugins {
    alias(libs.plugins.ksp)
    id("app.mashlab.compose-auto-preview") version "4.0.0"
}
2. Add a samples object and one preview function, as shown above. The function must be internal or public.
3. Render:
./gradlew :app:autoPreview
Requirements: Kotlin 2.0+, KSP 2.0+, Jetpack Compose or Compose Multiplatform 1.7+, minSdk 28, JVM 11. The artifacts are on Maven Central.
Upgrading from 3.x? The group moved from io.github.drunkendealer to app.mashlab, and the package moved to app.mashlab.autopreview. Drop the two old dependencies, apply the plugin, and update your imports.
Share the config across your app
Most apps want the same devices and themes on every screen. Hoist them into a wrapper annotation once:
@AutoPreview(
    samplesFrom = Unit::class, // placeholder, overridden at use site
    devices = [Device.Phone, Device.Tablet, Device.Foldable, Device.Desktop],
    themes  = [Theme.Light, Theme.Dark],
)
@Target(AnnotationTarget.FUNCTION)
@Retention(AnnotationRetention.SOURCE)
annotation class AppPreview(val samplesFrom: KClass<*>)
Now each screen declares only what's specific to it:
@AppPreview(samplesFrom = SettingsSamples::class)
@SettingsScreenAutoPreviews
@Composable
internal fun SettingsScreenPreview(
    @PreviewParameter(SettingsScreenPreviewSamplesProvider::class) state: SettingsState,
) = SettingsScreen(state)
That's the part that scales: 30 screens × 3 lines instead of 30 screens × 30 lines. Available devices are Phone, Tablet, Foldable, Desktop, Tv and Wear.
How it compares to screenshot testing
Paparazzi, Roborazzi and Google's Compose Preview Screenshot Testing are testing tools. They record golden images and fail the build when pixels change. You still write each preview or test yourself.
compose-auto-preview handles the step before that. It generates the previews and shows the whole app in one report. It doesn't diff images, so use it alongside those tools, not instead of them.
Good to know
- Dialogs and bottom sheets render in a separate window. Wrap them in
Box(Modifier.fillMaxSize())so the underlay has a canvas. - Kotlin Multiplatform: states and samples can live in
commonMain. The@AutoPreviewfunction goes inandroidMain, where KSP runs. - Locale is one value per preview. You rarely compare languages side by side, so rendering every locale would multiply the matrix for little gain. Change the
localefield when you want to check another language. - Report vs Studio: Robolectric and Studio's renderer are close but not always pixel-identical. Infinite animations freeze on their first frame.
When not to use it
With three screens and one device, stacked @Preview annotations are fine. This library pays off when:
- you have more than a handful of screens,
- you preview on several devices or in both themes,
- Studio's preview pane has already started to lag,
- you want a map of your app that can't go out of date.
The short version
One samples object and one annotation per screen. Studio stays fast with the first state, and ./gradlew autoPreview renders everything else into a report that doubles as a map of your app.
Try it on one screen: compose-auto-preview on GitHub, or browse the live demo report first.
FAQ
Why does Android Studio slow down with many Compose previews?
Studio keeps a render session for every preview cell in the open file, so memory grows with the number of cells. Stacking devices, themes and states multiplies that count, and a few screens can take gigabytes. compose-auto-preview shows only the first state in Studio and renders the rest outside the IDE.
How do I preview a Compose screen in every state without writing many @Preview functions?
List the states in a Kotlin object and annotate one preview function with @AutoPreview. KSP generates the PreviewParameterProvider and a multi-preview annotation for every device and theme, and ./gradlew autoPreview renders the full device × theme × state matrix.
Is compose-auto-preview a screenshot testing tool?
No. Paparazzi, Roborazzi and Compose Preview Screenshot Testing record golden images and fail the build on pixel changes. compose-auto-preview generates the previews and renders them into a browsable report, but it doesn't diff images, so it works alongside those tools.
Does compose-auto-preview work with Compose Multiplatform?
Yes. States and samples can live in commonMain. The @AutoPreview function goes in androidMain, where KSP runs and where the previews render.